Monday 27th September
Today we started filming our horror teaser trailer. Our first shot was the janitor's closet shot; whereby the main actor (Stacey) sees her dead self in the sink and slams the door hard. In terms of the shot of the Stacey slamming the door hard, we want the shot to be abrupt, so as to portray Stacey's feelings to audiences i.e. feeling frightened. The sink shot, took a very long time to film as we had to do many takes for the reason that we wanted to use a variety of camera angles to film Stacey in the sink. We also had to create a body angle that appears distorted and uncomfortable for Stacey as she playing a dead person.
Make-up also took a long time to do, as the blood needed to look realistic in order to make audience believe it is real. In addition, we had to think carefully about the camera movement so as to help build tension. This shot was filmed first as it is the most time consuming and in terms of location the most complex, for the reason that it is very difficult to light as light is only entering from one direction that is through the open door. In addition, we had to ensure the lighting is balanced and the emphasis is placed on the main actor rather than the setting.

Wednesday, 27 October 2010
Friday, 22 October 2010
Weekly Update
Monday 22 September 2010
Last week Wednesday at our weekly meeting, we discussed giving each member of the group something to ask audiences in the questionnaire for audience research. In this lesson we have combined the all questions together to make one questionaire and have began to distribute the questionaire through social networking sites such as; Facebook and MSN Messenger and devices via Blackberry messenger. We also distributed questionnaires to students and staff in college and to people outside college. As homework, members of the group each have a responsibility in the blogging of the audience research, e.g. one person gathers all the results from the including from the social networking sites and devices, another person creates the graphs and two people write about the graphs, this way the work is divided equally and fairly and done quickly.
Last week Wednesday at our weekly meeting, we discussed giving each member of the group something to ask audiences in the questionnaire for audience research. In this lesson we have combined the all questions together to make one questionaire and have began to distribute the questionaire through social networking sites such as; Facebook and MSN Messenger and devices via Blackberry messenger. We also distributed questionnaires to students and staff in college and to people outside college. As homework, members of the group each have a responsibility in the blogging of the audience research, e.g. one person gathers all the results from the including from the social networking sites and devices, another person creates the graphs and two people write about the graphs, this way the work is divided equally and fairly and done quickly.
Wednesday, 20 October 2010
Weekly Update
Wednesday 20th October
We used this lesson to re-film the corridor shots, because on Monday when we had tried to film we had difficulty with the lighting in terms its position, where it cannot be seen on camera and ensuring all the actors and extras appearing in the shot are lighted, and that the light is balanced. In addition, because we went against our storyboard and made slight changes, it became very confusing when trying film.
Today, filming was much easier as we knew where the lighting and actors had to be placed. We knew exactly how we wanted the shot to look and roughly how long we would like it to be. Only minor changes were made to the storyboard, e.g we added an over the shoulder shot to break the monotony of using medium close-up shots and to show conversation. We also used this lesson to film Stacey opening a door and running as a result of her hearing voices in her head; this was capturing in a continuous shot. Stacey's hand is seen opening the door and then running into the dark distance.
Tuesday, 19 October 2010
Making Of The Production Logo| Motionless Pictures
This part of the blog shows the making of the logo; after various trial and error, I was able to create the logo which best suited our production 'company'.
Photographs| Behind The Scene Shots
This section of the blog shows the stages of filming for the stairway shots.

For this scene we used the fake blood prop; the actor's face was covered in blood to help create the atmosphere of distortion.
Also to help the scene seem more realistic, the actor then took a handful of blood and placed this into her mouth. Which can be seen in the image below.


Behind The Scenes Filming And Planning For The Corridor Shot
Rhis section of the blog shows the stages of filming for the corridor shots.


Filming And Planning For The Janitors Closet Scene

For the early stages of filming the scene, we set up the camera and tripod. This part was not very difficult because we had already been shown last year how to set up the tripod and camera.
The next stage was to set up the lights, the whole group thought this would be the easiest part of the set up for the filming, but it was actually the hardest part of the set up, mainly because we had not taken the lighting very seriously. Below you can see a photo of Jocelyn one of the group members trying to set up the light in a better postion.


As time went on, we were still trying to find the best postions for the lights and we had our actor standing in various postions, repeating the scene over and over again.


One of the main issues we had with the lights is that the lights were reflecting against the red door because the paint used is non-reflective. This affected us greatly because anywhere the lights were postioned there was a bright white light on door, such as the one seen in the above photograph.


In the photo above you can see a dimmer was used on the lights to try and reduce the amount of light being reflected against the door, but this was not successful because the reflection was still shown on the door.
After some time we can up with an idea which was to change the shot from a medium shot to a close up, this was successful because the reflection off the door was not shown in the shot.


For the last shot of the scene we decieded to lower the tripod to the lowest postion possible so that we could get a low perspective of the action happening in the scene. This was a success because as the prop of the pink bag drops into the shot it makes the shot seem more dramatic and intense.


In conclusion, the filming for this scene of the trailer was successful, but in the early stages we did not think the shot would be possible. Then, after thinking for some time and with support from our teacher, we were able to film the scene.
Monday, 18 October 2010
Weekly Update
Monday 18th October As this is the last week before we break up for half-term, our aim is to try and get as much filming done as possible, so that we can spend the half-term working on blogger and the editing after the break, to ensure we finish our coursework on time. Today we filmed the corridor shot where Stacey talks with her friends and hears voices in her head and appears puzzled and lost around her friends. For this shot we used a medium close up and over the shoulder shot, to bring us closer to the actors. We used two members of a different group in media to be Stacey's friends for the reason that it is highly convenient for us, as using people who are non-media students is highly unreliable as it is unlikely for them to always be available every time we need them to film, or for that re-doing shots. We also used random students to be in the background of the shot, as we hoped we would get the shots we needed all in one take. Filming these shots took a very long time to try to film, as the lighting in the corridor is very unbalanced and we had to be very careful about the placement of the lighting so as to prevent it being seen on camera. We used two big lights and one small light to light the corridor, which still showed up on the camera as not enough and so this meant changing the camera shot from a long shot which was our first intention to a medium close-up. As we didn't achieve the shots we wanted and we have decided to continue filming into the next lesson.
Thursday, 14 October 2010
Test Shots: Door Scene
The video above contains the test shots of one of the scenes for production of our trailer. We shot the scene a various number of times so that we could have a variety of shots to pick from some shots of high-quality and some shots were not up to standard. The video shows a few of these shots, and the shot which we chose to use.
·
These two shots (Shot 1 MS, Shot 2 MCU), were shot in two different shots this allowed us to pick the best shot which best suited the narrative.
·
Shot 4 (MCU) was not a good shot to a great extent because the shot was not in focus which did not create the narrative we wished to create. We wanted the audience to notice the door handle in immense detail.
·
Shot 5 (MS) was shot at a low angle, so we could experiment with the type of narrative it would create. The only disadvantage of this shot was the shadow that was created by the lights.
Wednesday, 13 October 2010
Test Shots: Janitors Closet
The video above contains the test shots of one of the first scenes which shot in the production of our trailer. We shot the scene a various number of times so that we could have a variety of shots to pick from some shots of high-quality and some shots were not up to standard. The video shows a few of these shots, and the shot which we chose to use.
After trying various locations for the scene, we believed this location best helped create the gritty, tense, mysterious atmosphere we were trying to create, mainly because of the dirty sink, the different props around the sink such as the mops, cleaning liquids and much more that were used.
Most of the shots were of high quality but the disadvantage to a majority of the shots is the character moved in the shots when she was meant to be still, but I believe this can be fixed during the post-production period, because I believe I will be able to edit the shot to allow it cut before the actress moves.
This went well because as a group we were able to choose from various types of shots and come to a conclusion on which shot best described the narrative.
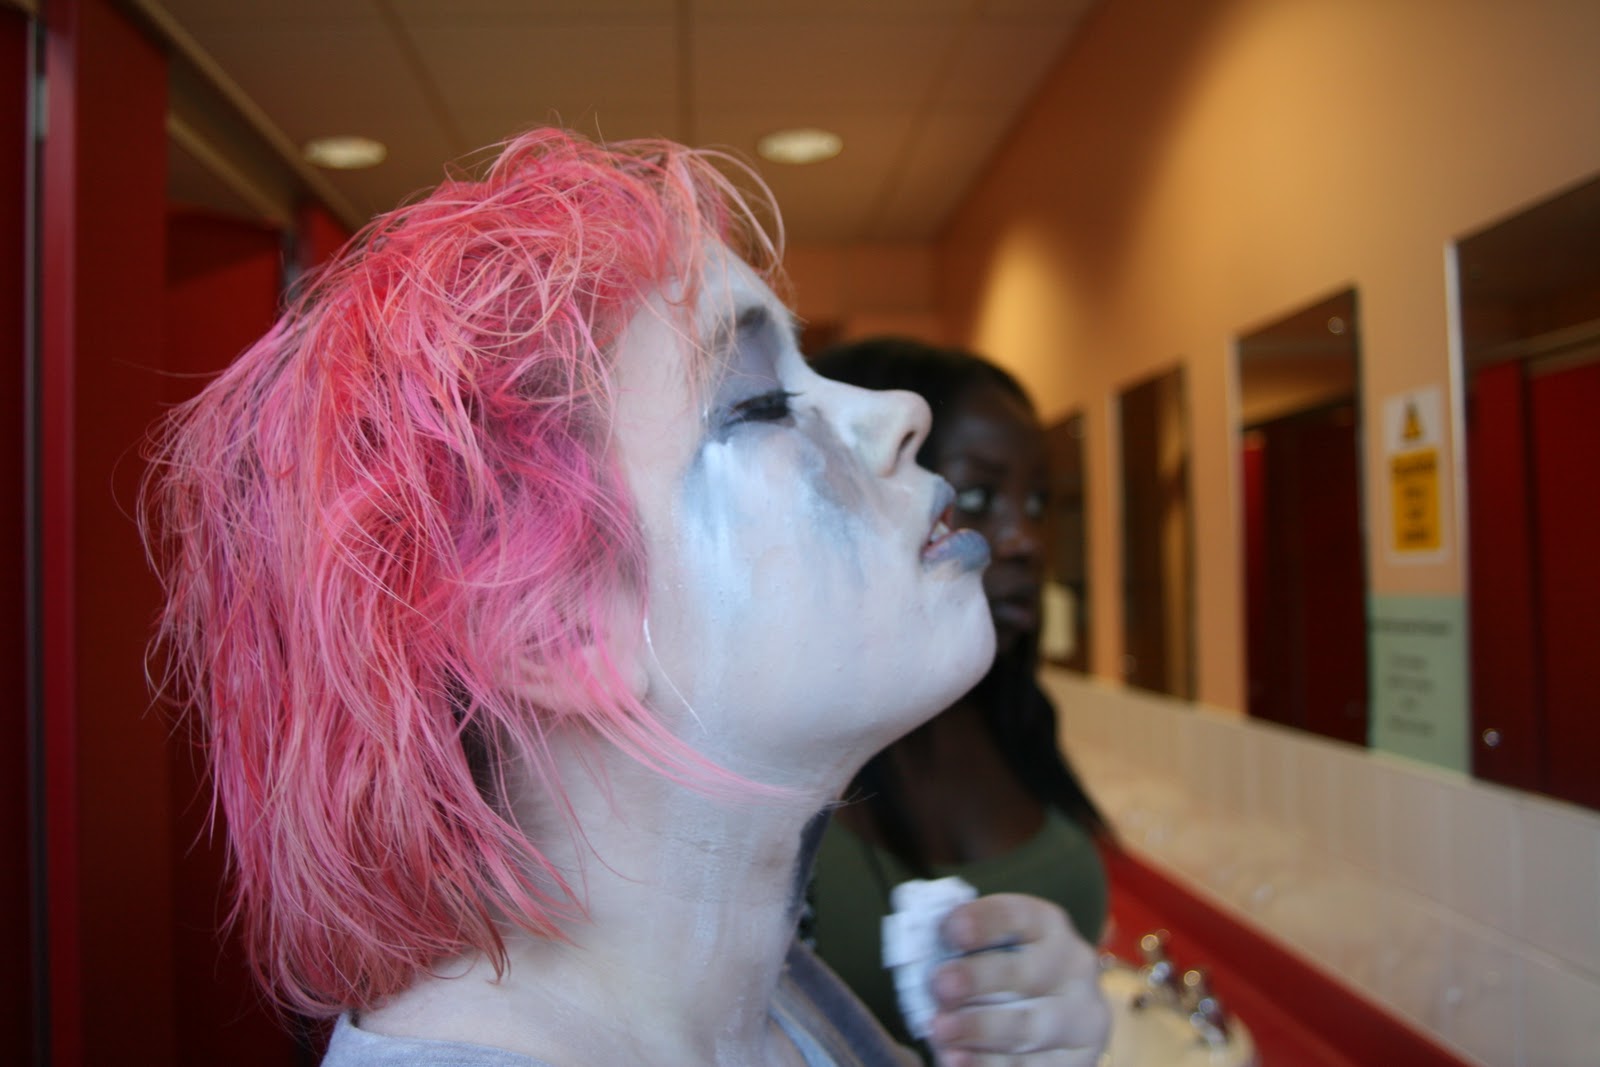
Make-Up in the Teaser Trailer
Make-up was briefly discussed in the previous ‘behind the scenes’ post. This post focuses on a more in depth look at the make-up used in our teaser trailer. The previous post can be viewed here: http://motionlesspictures010.blogspot.com/2010/10/behind-scenes-filming-progress.html Make-up is often used to improve or alter the appearance of a person’s body. This is a common practice in film, in which the make-up process can last hours depending on the look that needs to be achieved. Due to problems with time during the filming process, there was often not enough time to spend doing make-up in such a professional way. In many of the scenes we filmed, I (as the actress) wore none. This is uncommon in a film production, though it may have some advantages. The lack of make-up makes the protagonist appears more natural, which may make her more relatable among ‘ordinary’ teenage girls, and may give the film a more realistic sense. The main scene in which we did use make up was the scene in the janitor’s closet, in which we attempted to make the protagonist appear dead. Make-up used in scene: • Foundation no. 1 ‘Light’ • Talcum Powder • Black pencil eyeliner • Blue liquid eyeliner • Black eye shadow • Purple eye shadow • Blue eye shadow • Blue lip gloss • Ben Nye Stage Blood Steps in Make-up application 1. The first thing I did was brush my hair back from around my face and remove my piercings. This ensures that the make-up will not get into the hair and will be even around the area where my piercings are. 2. The first step in the actual application of the make-up was to add a thin layer of foundation to my face. I had to use the lightest shade because my skin is very pale; foundation works best if it looks natural and to do this it is important to have a shade as similar to the skin as possible. Normally foundation would be used to hide skin imperfections but in this case its purpose was to make the powder and the rest of the make-up stick to my face better. 3. Next, I applied a layer of talcum powder to face. The foundation helped here as the powder does not stick to the face naturally. Using white powder gives the pale look commonly associated with horror movies and death. 4. I then applied a thin layer of the black eyeliner. This was more for the characterisation than to accomplish the look of death, as we were trying to develop a specific look for the character. I also smudged the eyeliner, as crying, heat, being left in a sink, and the body beginning to deteriorate all would have played a part of making it run. 5. I applied blue, purple and black eye shadow to eyes. This gives the appearance of bruised eyes. Darker eyes are common when imitating death but this also furthers the implication that the character has been tortured. 6. Next, I applied a thin layer of blue eye shadow to my face and a mix of the blue eye shadow and blue lip gloss on my lips. This is because bodies typically take a bluish tone after death due to lack of oxygen, particularly around the lips, eyes and nails. 7. With most of the make-up done, I then brushed my hair forward again and dampened it to give it a messy and stiffened look. 8. Finally, I applied the stage blood to my face and any other necessary areas, including the clothes and even some of my hair. This was to show how badly the protagonist had been tortured before her ‘death’. The blood was used again in the stairwell scene when the girl is being tortured. The bruising effect made by the mix of black, blue and purple eye shadow was also used on my wrists in the closet scene. This is because the scene when the girl’s hands were bound originally used rope, which would create a bruising effect.
Costume in the Teaser Trailer
Costume was briefly discussed in the previous ‘behind the scenes’ post. This post focuses on a more in depth look at the articles of clothing used and the possible meanings behind them.
The previous post can be viewed here:
http://motionlesspictures010.blogspot.com/2010/10/behind-scenes-filming-progress.html
Costume is an essential part of film and entertainment and is one of the five components of mise en scene. It includes the clothing, accessories and hairstyle of the character and establishes the time, location and setting of the scene. We wanted the costume of the protagonist in our production to make her stand out from other students, though the scenes featuring other characters have been cut out of the final production. Since I was heavily involved in the costume and make up as well as being the actress in the trailer, many of the ideas were inspired by my own style, which possibly helped to make the costume look more natural.
The protagonist’s hair is shoulder length, messy and is dyed a bright pink colour. The unnatural colour may suggest that there is something unusual about her. However, being a stereotypically feminine colour, it may also connote an image of childlikeness and innocence.
The dyed hair together with the snakebite piercings (one piercing on each side of the lower lip) could be considered the image of a young girl trying to appear older, as is typical in many teenagers. Dyed hair and piercings are also common of those in ‘alternative’ subcultures, which is the look we were going for.
The protagonist is seen wearing two different sets of clothing in the production. One article of clothing that is the same in both are the boots she wears. They are brown leather boots decorated with silver studs. This too is common with teenagers and typical in specific subcultures.
The girl also wears a padlock on a chain around her neck. This is important because a padlock has connotes an important secret.
The effect of the padlock is supported by the hoodie jacket the protagonist often wears. Hoodies are common articles of teenage clothing; however, the girl wears a male jacket that is too large for her. This may be interpreted as the jacket possibly coming from a brother, friend or boyfriend, or the girl simply choosing to wear a man’s jacket. No matter the interpretation, the hoodie may imply different possibilities about the protagonist; it could be a sign that she has something to hide, or possibly that she has something to hide from. It is likely that the audience will not actively pay attention to this fact, though the information may sink in subconsciously as they watch.
The most often seen outfit the protagonist wears, aside from these three garments, is a pair of jeans and a stripy long sleeve jumper. Both are considered normal clothing for teenagers and actually make her appear more ‘normal’.
We see another outfit in the scene where the protagonist finds her own body in the janitor’s closet. The camouflage style trousers fit in with the previous idea that she has something to hide or hide from. The style is also typical in the punk subculture and is common in teenagers trying to look different. She also wears a long sleeve grey shirt and a dark blue t-shirt over it, another common style in punk and alternative subcultures.. These colours are dull and as such may fit in with the idea that the girl is dead.
The rips and blood stains in her clothes tell the audience that she has been violently attacked.
Photographs| Behind The Scenes Shots Costume and Make-up

Here, Jocelyn was helping Stacey prepare for the scene in which she is placed in the closet to look dead. We gave her the effect of ripping and tearing her clothes to give her a distorted look.


To give our actor a dead look we used powders to make her look her pale as dead people usually look. We also used tones of ashy cold colours such as grey and blues to give her that grim and gloomy apperance. The eyeshadows were used around the eye and lip area.

To make sure make up wasnt being too overdone, we used wet wipes and blusher brushes to dush off the excess powder and eyeshadows.
With the hair we wet her her completely so than we could back comb it and make it look rough an coarse.

Test Shots: Unknown Tapping By Closet
The video above contains the test shots for one of the scenes which we shot in the production of our trailer. We shot the scene a various number of times so that we could have a variety of shots to pick from some shots of high-quality and some shots were not up to standard. The video shows a few of these shots, and the shot which we chose to use.
Test Shot One
· This shot was not up standard for our trailer because of the eye-level it did not create the right atmosphere we wished for it to bring across to the audiences. One of the advantages of this shot that we noticed after we had shot it was the depth of field this allowed us to create a shot where the main focus was on the glove and not the face of the protagonist character.
Test Shot Two
· This shot compared to shot one is wider the audience are able to see the protagonist character, but the disadvantage of this shot is this depth of field is affected because the audience can see more the characters face this means the shot looks like it is at disequilibrium because the shot is more out of focus then in.
Final Shot
· The final shot we filmed I believe was the best shot, I find the depth of field, colouring and shot type made the shot best capture the moment we wished to capture. The only disadvantage are the posters on the door on the left of the shot.
Weekly Update
Wednesday 13th October Today we filmed Stacey being tapped on the shoulder and looking around, which is one our ending shots in the trailer. This took less time to film, as Stacey was not required to have any special effects make-up on and was filmed in a compact corridor. For the tap, we used a member of the group, as we know better than anyone outside of the group how we want the shot to look. The main prop used in the shot was a leather glove on the hand that taps Stacey's shoulder. The black leather glove was used as it creates a sense of mystery and fear, the person is unseen and their identity is unknown, and is intended to make audiences wonder who this is.
Tuesday, 12 October 2010


Updated Storyboard Using Photographs
** NEEDS NEW STORYBOARD FROM STACEY FOR SHOT NUMBERS ** Updated Storyboard Using Photographs
Below are the storyboards for the teaser trailer, using real life photographs. The group chose to make a second storyboard using photographs so that we could use this as a test for the type of shots first picked, by doing this we were able to check if the chosen shots from the hand drawn storyboard would work when we had an actual camera being used to create the shots. Also this helped our location recess because we were able to see if the location picked helped create the right atmosphere needed for the different scenes of the trailer. 


Subscribe to:
Comments (Atom)